> ## Documentation Index
> Fetch the complete documentation index at: https://docs.makemypass.com/llms.txt
> Use this file to discover all available pages before exploring further.
# Tickets Management
> This settings page can be accessed by clicking the **Tickets** button on the event page. This opens a modal with all available ticket management settings.
## Adding a New Ticket
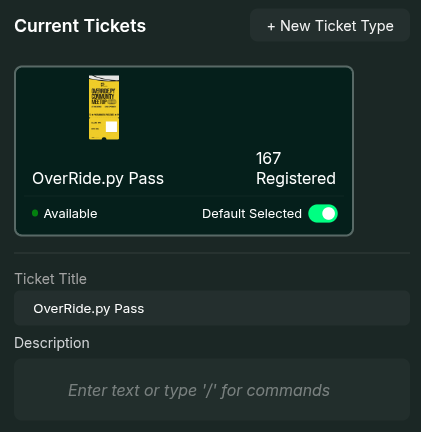 * Click the **New Ticket** button on the top-right corner of the modal.
* Enter a **Title** and **Description** in the input fields below the ticket display. both this fields will be shown to the user on the registration page
* Optionally, upload a **custom template** for the ticket. You can also [contact us](mailto:support@example.com) to set up a custom template.
## Ticket Options
The following are the key options available for managing tickets:
### 1. Waitlisting
* Enable **Waitlisting** to require event organizers to manually approve attendees who purchase this ticket from the **View Guests** page.
* Enable **Auto-Waitlisting** to automatically activate waitlisting when a predefined attendee limit is reached.
* Example: If the limit is set to `100`, waitlisting will activate once more than `100` attendees purchase the ticket.
As of now, waitlisting is only available for **Free Tickets**. For paid tickets.
All attendess who have paid for the ticket will be automatically approved.
### 2. Limit Capacity
* Set a maximum number of tickets that can be sold for a specific type.
* Once the limit is reached, no more tickets can be purchased.
Tickets can still be issued manually via the **Invite Guest** option.
### 3. Close Ticket
* Stop accepting submissions for a ticket by enabling the **Close Ticket** option.
Each event comes with a **General Ticket** created by default. If only one ticket type exists, it will not appear in the registration form. If multiple tickets are available, users will see an option to select a ticket.
## Paid Tickets
* Enable the **Paid Ticket** toggle to set a price for the ticket.
* Fees applicable to each ticket:
* **Platform Fee:** 4.72%
* **Gateway Fee:** 2.36%
You can choose to either:
The extra amount (platform + gateway fees) is collected from the user during registration.
for this you can enable the **Include Plaform Fee** toggle.
The extra amount is deducted from the total amount during the final settlement.
There are some advanced settings that can be configured for the ticket. Such as
adding custom prefix, number of digits, and ticket code format.
* Click the **New Ticket** button on the top-right corner of the modal.
* Enter a **Title** and **Description** in the input fields below the ticket display. both this fields will be shown to the user on the registration page
* Optionally, upload a **custom template** for the ticket. You can also [contact us](mailto:support@example.com) to set up a custom template.
## Ticket Options
The following are the key options available for managing tickets:
### 1. Waitlisting
* Enable **Waitlisting** to require event organizers to manually approve attendees who purchase this ticket from the **View Guests** page.
* Enable **Auto-Waitlisting** to automatically activate waitlisting when a predefined attendee limit is reached.
* Example: If the limit is set to `100`, waitlisting will activate once more than `100` attendees purchase the ticket.
As of now, waitlisting is only available for **Free Tickets**. For paid tickets.
All attendess who have paid for the ticket will be automatically approved.
### 2. Limit Capacity
* Set a maximum number of tickets that can be sold for a specific type.
* Once the limit is reached, no more tickets can be purchased.
Tickets can still be issued manually via the **Invite Guest** option.
### 3. Close Ticket
* Stop accepting submissions for a ticket by enabling the **Close Ticket** option.
Each event comes with a **General Ticket** created by default. If only one ticket type exists, it will not appear in the registration form. If multiple tickets are available, users will see an option to select a ticket.
## Paid Tickets
* Enable the **Paid Ticket** toggle to set a price for the ticket.
* Fees applicable to each ticket:
* **Platform Fee:** 4.72%
* **Gateway Fee:** 2.36%
You can choose to either:
The extra amount (platform + gateway fees) is collected from the user during registration.
for this you can enable the **Include Plaform Fee** toggle.
The extra amount is deducted from the total amount during the final settlement.
There are some advanced settings that can be configured for the ticket. Such as
adding custom prefix, number of digits, and ticket code format.