> ## Documentation Index
> Fetch the complete documentation index at: https://docs.makemypass.com/llms.txt
> Use this file to discover all available pages before exploring further.
# QR Scanning and Check-In
> This guide provides a comprehensive overview of the QR scanning and check-in process, including inventory management and remote printing options.
## Check-In Options
 ### Check-In User
* Click this option to check in a user to the main event venue.
* if the [check-in confirmation](/event/eventPage/advanced-edit-event#check-in-confirmation) is enabled, a confirmation pop-up will appear after scanning the QR code.
* The organizer can choose to check in the user or cancel the action.
* If the user is already checked in, a pop-up will appear indicating that the user is already checked in.
### Venue Check-In
* if you have added any [venue](/event/eventPage/manage-venues) to your event, this option will be available.
* Click this option to check in a user to a specific venue.
* If the user is already checked in to that venue, a pop-up will appear indicating that the user is already checked in.
### Check-Out User
If **Check-Out User** is enabled from the [event advanced settings](/event/eventPage/advanced-edit-event#enable-checkout-scan), this option will be available.
* Click this option to check out a user from the main event venue.
## Inventory Management
### Inventory
Use this option to distribute perks/goodies to guests by scanning their QR codes at the distribution counter.
### Check-In User
* Click this option to check in a user to the main event venue.
* if the [check-in confirmation](/event/eventPage/advanced-edit-event#check-in-confirmation) is enabled, a confirmation pop-up will appear after scanning the QR code.
* The organizer can choose to check in the user or cancel the action.
* If the user is already checked in, a pop-up will appear indicating that the user is already checked in.
### Venue Check-In
* if you have added any [venue](/event/eventPage/manage-venues) to your event, this option will be available.
* Click this option to check in a user to a specific venue.
* If the user is already checked in to that venue, a pop-up will appear indicating that the user is already checked in.
### Check-Out User
If **Check-Out User** is enabled from the [event advanced settings](/event/eventPage/advanced-edit-event#enable-checkout-scan), this option will be available.
* Click this option to check out a user from the main event venue.
## Inventory Management
### Inventory
Use this option to distribute perks/goodies to guests by scanning their QR codes at the distribution counter.
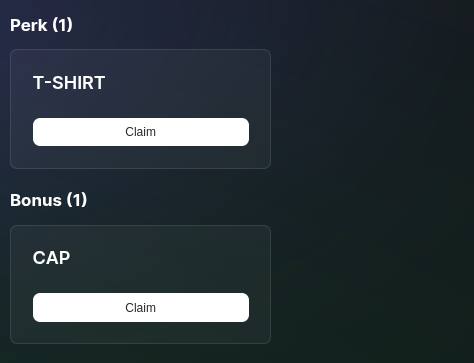 This distribution method is preferred if a common goodie is being distributed to the guests from a single counter. Here **goodie** is only selected once and the guest QR is scanned multiple times during distribution.
**Steps:**
1. Click **Inventory**
2. Select **Goodie Name**
3. Scan **Guest QR**
4. Distribute Item
5. Repeat steps 3 and 4 for each guest
### Individual Inventory
Unlike the **Inventory** option, this mode requires scanning the guest's QR code first to display the list of available items. The organizer can then select and claim a specific item.
This distribution method is preferred if a common goodie is being distributed to the guests from a single counter. Here **goodie** is only selected once and the guest QR is scanned multiple times during distribution.
**Steps:**
1. Click **Inventory**
2. Select **Goodie Name**
3. Scan **Guest QR**
4. Distribute Item
5. Repeat steps 3 and 4 for each guest
### Individual Inventory
Unlike the **Inventory** option, this mode requires scanning the guest's QR code first to display the list of available items. The organizer can then select and claim a specific item.
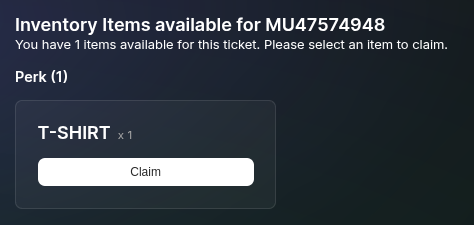 This distritbution method is preferred if a number of goodies are being distributed to the guest. Here the guest QR is scanned once and the availabel goodie is selected multiple times during distribution.
**Steps:**
1. Scan **Guest QR**
2. View available goodies
3. Select goodie to distribute
4. Confirm claim
5. Repeat steps 3 to 4 for each guest, until all goodies are claimed
### Add Bonus
If a particular goodie has not been pre-allocated, use this option to add it manually for a guest.
This distritbution method is preferred if a number of goodies are being distributed to the guest. Here the guest QR is scanned once and the availabel goodie is selected multiple times during distribution.
**Steps:**
1. Scan **Guest QR**
2. View available goodies
3. Select goodie to distribute
4. Confirm claim
5. Repeat steps 3 to 4 for each guest, until all goodies are claimed
### Add Bonus
If a particular goodie has not been pre-allocated, use this option to add it manually for a guest.
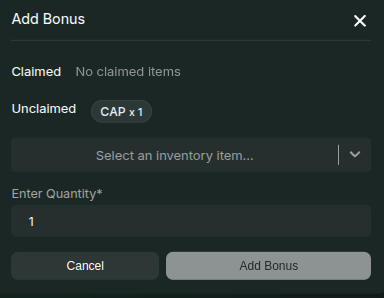 **Steps:**
1. Scan **Guest QR**
2. Select goodie(s)
3. Choose quantity to allocate
4. Confirm allocation
* The list of claimed goodies as well as the quantity and goodies which was allocated but not claimed will also be displayed.
After allocation, use either **Inventory** or **Individual Inventory** to distribute the goodies.
## Print Ticket
### Remote Printing
Remote Printing allows you to print tickets from a different location than the one where the QR code is scanned. This is useful for events with multiple counters or locations.
If **Remote Printing** is enabled from the [Advanced Event Settings](/event/eventPage/advanced-edit-event#remote-printing), the following options will be available:
* When a valid QR is scanned, available online printers and their IDs will be displayed.
* Select a printer ID and assign the print job to that counter.
### Normal Printing
If **Remote Printing** is not set up:
* The print window will open directly in the browser.
* The QR and other ticket details will be formatted according to the predefined schema.
* ID cards can be printed directly from the same device.
The print schema can be only configured by us for you. Please reach out to us if you need any changes or need to set up a new schema.
## Setup Remote Print
If **Remote Printing** is enabled in event settings, this option will be visible.
**Steps to Set Up:**
1. Select **Setup Remote Print** and open it on the printing counter.
2. On first launch, enter a unique **Printer ID**.
3. Keep the window open.
4. Once a ticket print is initiated, it will be assigned to your printer ID.
5. The print job will appear on the dashboard, allowing you to print the ticket.
**Steps:**
1. Scan **Guest QR**
2. Select goodie(s)
3. Choose quantity to allocate
4. Confirm allocation
* The list of claimed goodies as well as the quantity and goodies which was allocated but not claimed will also be displayed.
After allocation, use either **Inventory** or **Individual Inventory** to distribute the goodies.
## Print Ticket
### Remote Printing
Remote Printing allows you to print tickets from a different location than the one where the QR code is scanned. This is useful for events with multiple counters or locations.
If **Remote Printing** is enabled from the [Advanced Event Settings](/event/eventPage/advanced-edit-event#remote-printing), the following options will be available:
* When a valid QR is scanned, available online printers and their IDs will be displayed.
* Select a printer ID and assign the print job to that counter.
### Normal Printing
If **Remote Printing** is not set up:
* The print window will open directly in the browser.
* The QR and other ticket details will be formatted according to the predefined schema.
* ID cards can be printed directly from the same device.
The print schema can be only configured by us for you. Please reach out to us if you need any changes or need to set up a new schema.
## Setup Remote Print
If **Remote Printing** is enabled in event settings, this option will be visible.
**Steps to Set Up:**
1. Select **Setup Remote Print** and open it on the printing counter.
2. On first launch, enter a unique **Printer ID**.
3. Keep the window open.
4. Once a ticket print is initiated, it will be assigned to your printer ID.
5. The print job will appear on the dashboard, allowing you to print the ticket.