- Draft: The default state when creating an event. The public event page is inactive.
- Published: The organizer must change to this state to make the event registration form public.
- Completed: Once the event is completed, the organizer should update the status to Completed to stop new registrations.
The event status is automatically updated if the event’s end date and time are set.
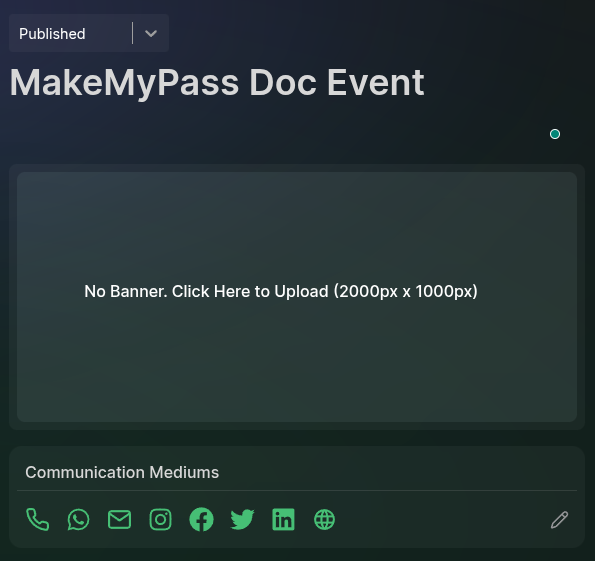
Event Banner
The organizer can update the event banner from this page. By default, no banner is present. Click the Banner Card to upload an image.Communication Mediums
The organizer can add communication mediums, which will be displayed on the event registration page so attendees can use them to contact the organizer.Adding a Communication Mediums
- Click the Edit icon in to the communication mediums box.
- In the modal that opens, add the required mediums link and click Save.
You can open the same modal to edit or delete existing mediums.
About the Event
Below the communication mediums, use the text editor to add a description about the event. This will be shown on the registration page.Public Event URL
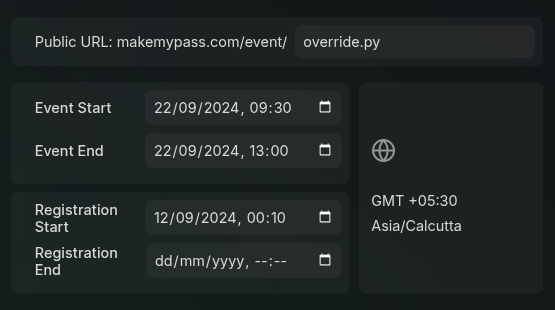
- By default, the public event URL is generated from the event title, which is set during the event creation process.
- It can be manually updated from the Public URL section.
- The base URL (
makemypass.com/event) is not editable, but the event title portion is editable.
Event Dates
The event dates are crucial for setting the event’s timeline. The organizer can set:- Event Start & End Dates: The actual dates when the event occurs.
- Registration Start & End Dates: The time frame during which the registration form is active.
Primary Event Options
Audio Form Fill
An AI-enabled feature allowing users to provide registration details via voice input, which will be transcribed and filled automatically.
Invite Only
If the event is invite-only (no public registration form), enable this setting. In
such an event attendees can be added manually by the organizer. using the bulk or individual methods.
Online Event
If the event has no physical location, enable this setting to hide the location section. the online check-in feature can be used to track attendees during the event.
Capacity
The total attendee capacity for the event. If there are multiple tickets, their total sum should be less than or equal to this count.
Offline Location Settings
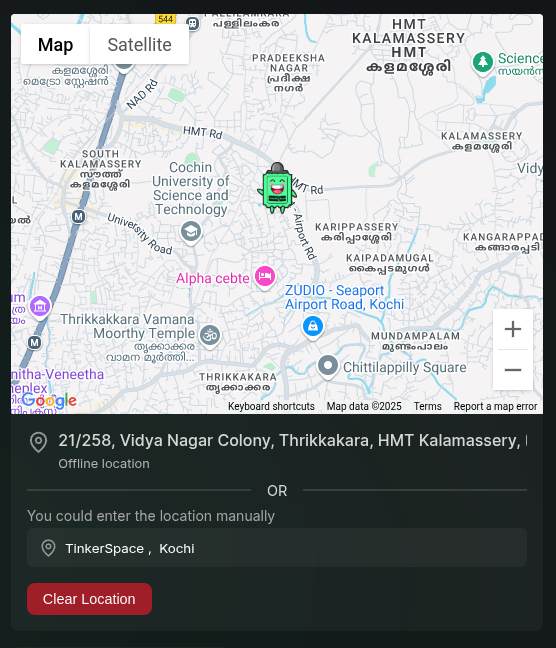
- Use the embedded map to search for and select the event venue.
- By using the input field below the map, you can search for a location by name or address.
- The map will automatically update to show the selected location. If the location name is too long, you can edit it in the input field.
Updating the Event Logo
Upload an event logo to complete the initial setup.- The logo appears in event listings and on the dashboard.
Deleting an Event
You can delete an event along with all associated data using the Delete button.Advanced Event Settings
There are some advanced settings that can be configured for the event. Such as
showing the tickets first in public form, enabling mutliple day checkin